
Survival - How To Build A Knife
2 posters
Page 1 of 1

Knife Selection
![]() by wannabemountainman Wed 16 Sep 2009, 04:27
by wannabemountainman Wed 16 Sep 2009, 04:27
Abstract
The knife is the most important item in your survival gear. It's multitude of uses puts it above all other things you might carry into the bush. With that said it is important to chose the right knife. Being this site is specific to the boreal region of North America, the best knife has the following characteristics:
- Carbon Steel or AUS 8 Stainless
- 4-6" Blade length
- Full Tang Construction
- Strong Blade Point
- 5/32" and 1/4" Blade Thickness
Material

The material that makes up the blade determines the durability, rigidity and overall usefulness of the knife. Therefor take notice of the blade material when chosing a knife. Of the many choice, two stand out as superior steel qualities. Carbon and AUS 8 steel. The former has an infusion of carbon during the smelting process that creates a very hard steel, allowing it to take and keep an edge better. The latter is normal steel with an antioxidant layer or mixture that prevents rust.
Either steel has its pros and cons. Carbon steel rusts easier when it's not in frequent use, but holds an edge better and can be used with flint to create sparks. Stainless is better in wet environments where rusting may pose a problem, but it's a softer steel that does not take or hold an edge as well. Whichever you chose, beware cheap steel such as those made in China and surrounding areas.
Blade Length
 Mors Kochanski recommeneds a blade length no longer than the width of your palm, likewise for the handle. He explains this length gives you the greatest control in most situtations you'd come across in the bush. For the bushcrafter, a long knife is not the ideal knife. Lengths beyond 6" become unwieldy and cumbersome, not to mention adding unnecessary weight. While it make be tempting to buy a Rambo knife or a big bowie, the purpose of these knives are for combat, not the delicate work associated with bushcraft activities.
The SRK is probably an inch or two too long.
Tang Construction
There are three kinds of blade/handle construction, but only full tang should be considered.
- Full Tang - The material the blade is made from, a solid piece of steel, extends through the handle for the length and width. This is the most rugged and durable.
- Narrow Tang - The metal that extends through the handle is tapered.
- False Tang - The blade connects to the handle by rivets, a bolt, or even glue. The $20 "survival knifes" with hollow handles use this half-assed method. Very brittle.
Blade Point

 The blade point is the weakest part of a full tang knife. You use the point more often than you'd think so if the point is heavily tapered it will most likely fail at some point. Look for a knife with a sturdy point that does not flex or break when put under strain. A good test is to stab your knife into a log or 2x4 with all your strength and then pry it out without pulling.
The SRK has a good, solid point.
Blade Thickness
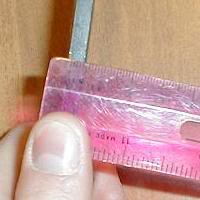 Depending on your use, the blade can be thick or thin. If you do a lot of hacking, batonning, or prying then a knife with a thick blade is important. If you are less strenuous with your application such as cutting rope, carving or gutting/skinning then a thinner blade will work. But generally stick between the 5/32 and 1/4" range. Any thinner and it'll be too flexible or weak, any thicker and it'll be harder to keep a keen edge.
 The SRK's blade width is 0.5cm thick.
Other Thoughts

The finger guard prevents your hand from slipping over the blade but it can also hamper your hand position during finer work where you may need to move up the blade. If you are careful you can do without a guard but there is always the chance for a bad cut when the handle gets wet. I've come to recommend an underside guard that protects the fingers from the blade edge.
Look for a lanyard hole, or the ability to make your own. Not only is this easier for you to hold your knife but also extends its chopping range.
The handle material should not be slippery when wet and should be a synthetic, rubbery material with plenty of texture.
Avoid serrations and "saw blades". Serrations are meant to cut/rip flesh and synthetic materials, "saw blades" cut small logs. Unless you plan to cut nylon rope or fabric, avoid serrations. There are also notoriously hard to sharpen in the bush. Saw blades are pretty much useless. They come from military bayonet design where the saw 'teeth' are meant to deal extra internal damage. Few saw knives are actually designed for cutting wood and even fewer are efficient at it.
Stick with single edged blades. Double edge blades are used for thrusting and stabbing and use of one is just asking for a bad cut when used as a utility knife.
Folding knives are compact and store the blade out of the way, but the more moving parts you have the more things can go wrong. While there is nothing wrong with a folder, make sure the pivot point is simple and durable, ensuring that it won't fail in the field when dropped or dirty.
Price should not be an issue when selecting a knife. It will be your best friend and most used utility item in your pack. However be wary of "custom" knives such as the Bear Grylls knife that costs $710 USD just because it has his name on it.
Recommended Knives
Cold Steel SRK
Buck Vanguard
Becker BK10
Fallkniven H1
SOG Seal Pup
Frosts Mora S1
RAT-3 or RAT-5

wannabemountainman- Admin
- Posts : 433
Join date : 2009-07-12
Age : 74
Location : M'boro UK -

Sharpening
![]() by wannabemountainman Wed 16 Sep 2009, 03:29
by wannabemountainman Wed 16 Sep 2009, 03:29
Sharpening
The following information was pulled from cornerhardware.com.
Most people don't sharpen their knives as often as they should, perhaps because they think it's too complicated or too much trouble. But unless an edge is bent or chipped, sharpening a pocket knife, a kitchen knife or even a cleaver is pretty simple. With a sharpening stone, the right lubricant, a little technique and some practice, you'll never put up with another dull edge.
Step by Step
1. Match the sharpening angle to the bevel angle. Every type of knife blade has its own bevel angle. Paring and filleting knives that have to slice through delicate flesh, such as tomatoes or raw fish, have shallow bevels just 5 to 10 degrees. Their edges are very sharp but easily blunted. A camping knife or pocket knife should have a bevel of 10 to 15 degrees; its edge is less keen but will stay sharp longer. Cleavers and chopping knives that have to cut through bone have an even steeper bevel, usually between 15 and 25 degrees. You'll need to hold your knife at an angle that pretty nearly matches the bevel angle when you're sharpening the blade. For a handy visual reference, print the sharpening gauge shown below and use it as a guide when you sharpen your knives.

2. Lubricate the sharpening stone. Lubricant is important because it keeps the pores of the stone from getting clogged with grit. When metal filings begin to cover the stone's surface as you're sharpening, it's time to add fresh lubricant. On an oil stone, use sharpening oil or light machine oil, such as Three-In-One. A diamond stone does well with a mixture of water and liquid dishwashing detergent. A water stone needs to be soaked in water before you start and then lubricated with water.
3. Sharpen the first side. Set your sharpening stone on a sturdy bench or tabletop, and make sure that it won't shift around while you're using it. Set the edge of the knife against the stone's surface, keeping the body of the blade at the desired angle. Lock your wrists and work the edge back and forth over the stone a dozen times or so, using a circular motion. If the knife blade is curved or if it's longer than the stone, you'll need to sweep the blade sideways as you work, so the entire edge is sharpened evenly. Apply moderate pressure as you sharpen, so that you can feel the stone's abrasive surface at work.
4. Sharpen the second side. After you've sharpened one side of the blade, flip the knife over and do the other side the same way, working the entire edge until it's evenly sharpened. If you started on the coarse side of your combination stone (a good idea with a very dull blade), sharpen both sides of the knife again on the fine side of the stone. You can test your progress by trying to slice a piece of paper held in the air (do this carefully, cutting away from your hand). A really sharp knife will slice cleanly through the paper with little effort.
5. Refine the edge by honing. Finish the edge by giving it a quick honing with a ceramic honing rod or knife steel. This kind of tool looks like a long finger-thick cylinder of fine abrasive metal or other material set into a handle. Honing finishes the process by eliminating the burr that's left by the stone and subtly shaping the microscopic edge of the blade for maximum keenness. Lightly rub each side of the edge against the honing tool. As you do this, keep the angle of the knife a little wider open than the bevel angle you used to sharpen it.

Hone the blade now and then when you're using the knife. When honing no longer refreshes the edge, it's time to go back to the stone for another sharpening. When your edges are keen, keep them that way by storing your knives properly. If you have to store a knife loose in a drawer, keep it in a cardboard sheath to protect its edge.
Care
Care is pretty simple and the following principles can be applied to all knives.
- Avoid using your knife. This may sound counterproductive, but your knife is the only advanced tool you have in the bush. If you can, make other tools to do the job. Spears can be cut from saplings, hammers can be made from rocks and large sticks, etc. Reserve your knife for jobs it was specifically intended.
- Always clean your knife before being sheathed. Even if this means wiping the blade on your pants, the important thing is to remove dirt, grime, blood, and moisture.
- Avoid hard object. This means if you are carving or cutting, don't let the knife slip and hit a rock or sidewalk. Even hitting another piece of metal seriously damages your edge and may take hundreds of sharpening sessions to remove the nicks.
- Sharpen your edge often. A sharp knife is an effective knife. What may take you 50 slices of a dull blade to cut a sapling will take 6 or less with a sharp blade.
- Clean and oil before long term storage. Wipe clean your knife and coat in a thin coat of oil or wax before long term storage. Do not store your knife in the sheath when stored for longer than a month.
wannabemountainman- Admin
- Posts : 433
Join date : 2009-07-12
Age : 74
Location : M'boro UK -
Blade Geometry
![]() by wannabemountainman Wed 16 Sep 2009, 02:36
by wannabemountainman Wed 16 Sep 2009, 02:36
The following information was pulled from outdoor-magazine.com.
A consideration on blades geometries
Blades of chopping knives enter roughfully into 3 types, the forward curved blades, kukri (khukuri), bolos, falcatas, the straight blades, modern knives machetes, and the backward curved blades, some parangs, goloks, sabres, katanas and other sabres...
Each geometry presents advantages for a number of styles and uses, from chopping to slicing.

Outlines
a): backward curve.
b): straight.
c): forward curve.
Backward curved
Backward curved blades are excellent choppers, because when used with a rotating draw cut, their cutting power on soft material is simply impressive. That is the power of the fearsome sabre cut.
For slicing, they are useful, as the slight belly can be used with advantage, as the tip may simply protrude in the air, but the general curve helps slicing, and general use, it can be used for hashing, or even as a sickle, though may be not the easiest geometry for that.
Forward curved
Forward curved blades also make excellent choppers. They can be often used in a variety of cut types, from the draw cut to the "inversed" draw cut. While knives presenting only a recurve can rather be called "sickles". Knives of this type often present a belly and a recurve, as with the kukri and bolo, and therefore can do a multitude of tasks and be used into harder material that simply a sickle.
For slicing, well, it depends what and the exact geometry, for sure a sickle may not be a be a kitchen knife, While a kukri does a lot of things quite well, thanks to it’s usable belly.
Straight
Purely straight edges well are in between the two. A purely straight edge without a belly may also see limited use, but on a machete, by example, it does allow to be used as a chopper or a slicer in a variety of strokes.
A consideration on blades profiles
Blades profiles will indeed greatly influence the efficiency. [A correctly sharpened knife increases efficiency exponentially]
Types of cut, non dynamical

Types of cuts
a): Pushing.
b): Slicing.
c): Rolling.
There are three basic types of cut
Indeed, other uses are possible like piercing, but this mainly requires an adequate tip.
The combination of any or all of these together will be called shearing. and makes cutting in general more efficient.
Chopping is the act of push cutting after having accelerated the blade before it encounters the material, using it’s inertia from it’s mass and speed in order to obtain a deep cut. Speed and inertia add dynamics.
Chopping: cutting under dynamics
These movements are shown here with knifes, but they could be imagined using different sort of axes, sickles or other dynamical cutting tools.
Chopping
The normal movement of chopping, here shown with a kukri.
a): blade dragged a lot behind hand, creating a shearing effect.
b): blade at flat impact, push cut.
c): blade forced forward creating a shearing effect.
Depending on how a blade is held, different effects can be observed. the position b) is the most standard one, and results in the edge simply push-cutting. This is here demonstrated using a kukri geometry , but is possible with all kind of blade types. The position a) creates a shearing cut, because the edge enters the material at an angle. the infamous guillotine’s blade, angled at 45 degrees is said to improve cutting by 40 percent on a variety of materials (not to say heads). The c) position creates the same kind of effect, but is also more dangerous as it makes the movement prone to glances and therefore changes of direction.
Rotating or rolling

Rotating
This shows impact rotation.
Two possible ways: in the direction of the green arrows (tip down) of in the direction of the blue arrow (tip up).
Rotating at impact will also create a moderate shearing effect. The rotation can happen in two directions, tip down and hand up, or tip up and hand down. Rotating is best done when associated with a draw cut or inversed draw cut.
Draw cut or sabre cut

Draw cut
Here is shown using different blade geometries how a draw cut can be performed.
a): using a kukri.
b): using a straight knife.
c): using a golok.
The draw cut or saber cut is achieved by pulling the knife at impact. Another way is to drag the blade slightly behind the hand with the arm in a rotational movement from the shoulder. This creates a strong shearing effect, as the edge push cuts and slices in the same time. It is in the example shown with various blade types. Some blade types make it instinctive, some more difficult.
It is a surprising thing, as one can cut 6" sapling for a day in 3 or 4 strokes and then suddenly master a draw cut that flies though it at first stroke, the blade not even feeling it or being stopped.
Inversed draw cut or wrist snap

Inversed draw cut
Here is shown using different blade geometries an inversed draw cut.
a): using a straight knife.
b): using a kukri.
c): using a golok.
The inversed draw cut consist of pushing the blade away instead of pulling it down. most people describe it as a wrist snap at the moment of impact or slightly before. Again, in this example it is shown using different geometries and some blade types like the kukri are better than others at that.
Like for the draw cut, the cutting power is much stronger, though it is difficult in the extreme to make it as powerful as an extreme draw cut, but the blade may not be stopped by what usually stops it.
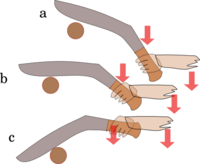
The forced cut

Forced cut
Here is an example of a forced cut
a): using a backward curved blade.
b): using a forward curved blade.
The forced cut happens when the geometry’s natural tendency is used to force the edge in the material to cut, by pulling it in of pushing it in depending on the blade geometry. It could be thought that it is similar to a simple chopping movement using a flat bladed machete, hitting flat, but not exactly as the shoulder and arm and torso are really implied into pulling, or pushing away laterally, giving it even more power.
It is generally applied by people using great force, which makes it quiet dangerous in case of miss, glance, or deflection.
Combinations
Most of the time, an effective movement will be a combination of the previous basic moves.
Rotation points
Indeed nothing is simple, and any of these moments is subjected to anatomy, and while chopping or using a knife in general, a lot of joints are used to create either translations or rotations or complex rotations, in order to create the desired effects, and increase or lower power.

Points or rotation
Here simplified:
a) wrist
b) ankle
c) shoulder
d) spine
So, indeed efficiency while chopping, is a question of coordination, and using the right dose of power. Often gravity is quite enough to achieve the desired effect.
Safety
I insist that full full force blows are prone to lead to serious injuries. The correct manner is to speed the blade, and then let it impact. This will save the handles/blade junctions, is less tiring, and will produce less unsafe glances deflections and cut-through. Working with gravity is the right way. At least start the learning curve this way, after it is easy to add power properly.
The following information was pulled from Field and Stream Magazine.
Fell a tree
 If you can double a sapling over using one hand (limber it up by bending it back and forth several times), you can slice the trunk in half using downward pressure with an angle cut. The sapling must be green and the pressure should be evenly maintained throughout the cut, although with larger trees it may be necessary to rock the blade. Support the sapling as the trunk weakens. It will be impossible to finish the cut if the wood splinters.
To bring down softwood trees (poplar, birch, some evergreens) up to 6 inches in diameter, pound the knife tip into the tree at a right angle to the trunk, then jerk it sideways or pound the spine with a baton (a hard stick used as a club) to work the blade back and forth and widen the cut. Repeat the process around the trunk.
Split Wood
 A knife runs a poor second to an axe as a chopping tool, but when pounded with a baton, a small blade is perfectly capable of making dry splits from wood blocks. Rapping the knife with a baton, split a thin shingle from the side of a dry wood block. Sharpen the edges of the shingle to make a wedge, insert the wedge into a crack in the wood (or make a crack in the wood with the blade), then pound the wedge with a baton to make wood splits for the fire. Using a series of wedges, you can split a log section lengthwise. You can also use a baton and blade to split the chest cavity of an elk or moose. Keep to one side of the sternum for an easier cut.
Create cord
 Cord is a primary survival tool, essential for fashioning bowstrings, lashing gear, and strengthening braces for shelter. The hide of almost any animal can be rendered into strips using a circular cutting technique. Drive the knifepoint into a flat wood surface, then pull the hide into the blade in a circular pattern to make a long strip. A guide peg driven into the wood maintains an even cut.
Make a fire starter
 If you can’t find dry kindling for building a fire, you can use your knife to make some in the form of a fuzz stick. Rest the end of a stout stick on the ground, then shave downward to lift curls of dry wood. At the end of each stroke, pry outward with the blade to spread the feathers. The end result will burn readily.

 Similar topics

A consideration on blades geometries
Blades of chopping knives enter roughfully into 3 types, the forward curved blades, kukri (khukuri), bolos, falcatas, the straight blades, modern knives machetes, and the backward curved blades, some parangs, goloks, sabres, katanas and other sabres...
Each geometry presents advantages for a number of styles and uses, from chopping to slicing.
Outlines
a): backward curve.
b): straight.
c): forward curve.
Backward curved
Backward curved blades are excellent choppers, because when used with a rotating draw cut, their cutting power on soft material is simply impressive. That is the power of the fearsome sabre cut.
For slicing, they are useful, as the slight belly can be used with advantage, as the tip may simply protrude in the air, but the general curve helps slicing, and general use, it can be used for hashing, or even as a sickle, though may be not the easiest geometry for that.
Forward curved
Forward curved blades also make excellent choppers. They can be often used in a variety of cut types, from the draw cut to the "inversed" draw cut. While knives presenting only a recurve can rather be called "sickles". Knives of this type often present a belly and a recurve, as with the kukri and bolo, and therefore can do a multitude of tasks and be used into harder material that simply a sickle.
For slicing, well, it depends what and the exact geometry, for sure a sickle may not be a be a kitchen knife, While a kukri does a lot of things quite well, thanks to it’s usable belly.
Straight
Purely straight edges well are in between the two. A purely straight edge without a belly may also see limited use, but on a machete, by example, it does allow to be used as a chopper or a slicer in a variety of strokes.
A consideration on blades profiles
Blades profiles will indeed greatly influence the efficiency. [A correctly sharpened knife increases efficiency exponentially]
Types of cut, non dynamical
Types of cuts
a): Pushing.
b): Slicing.
c): Rolling.
There are three basic types of cut
- (a) Pushing, Push cutting, when the edge is pushed through the material. as is is the case for a razor, a chisel. Generally adapted to softer material. Pushing requires extremely polished and smoothly profiled edges in order to minimize adherence and maximize ease of penetration
- (b) Slicing, Slice cutting, when the edge is used in a sawing movement the material. Slicing requires coarse or dented eges in order to maximize the sawing movement. Kitchen knives are often used this way. Cutting ropes and tough fibrous materials requires slicing.
- (c) Rolling, rolling the edge over the material, giving a rotation to the edge. Rolling requires like pushing polished edges, and thin profiles. An ulu, may be used this way, some round bladed leather knives too.
Indeed, other uses are possible like piercing, but this mainly requires an adequate tip.
The combination of any or all of these together will be called shearing. and makes cutting in general more efficient.
Chopping is the act of push cutting after having accelerated the blade before it encounters the material, using it’s inertia from it’s mass and speed in order to obtain a deep cut. Speed and inertia add dynamics.
Chopping: cutting under dynamics
These movements are shown here with knifes, but they could be imagined using different sort of axes, sickles or other dynamical cutting tools.
Chopping
The normal movement of chopping, here shown with a kukri.
a): blade dragged a lot behind hand, creating a shearing effect.
b): blade at flat impact, push cut.
c): blade forced forward creating a shearing effect.
Depending on how a blade is held, different effects can be observed. the position b) is the most standard one, and results in the edge simply push-cutting. This is here demonstrated using a kukri geometry , but is possible with all kind of blade types. The position a) creates a shearing cut, because the edge enters the material at an angle. the infamous guillotine’s blade, angled at 45 degrees is said to improve cutting by 40 percent on a variety of materials (not to say heads). The c) position creates the same kind of effect, but is also more dangerous as it makes the movement prone to glances and therefore changes of direction.
Rotating or rolling
Rotating
This shows impact rotation.
Two possible ways: in the direction of the green arrows (tip down) of in the direction of the blue arrow (tip up).
Rotating at impact will also create a moderate shearing effect. The rotation can happen in two directions, tip down and hand up, or tip up and hand down. Rotating is best done when associated with a draw cut or inversed draw cut.
Draw cut or sabre cut
Draw cut
Here is shown using different blade geometries how a draw cut can be performed.
a): using a kukri.
b): using a straight knife.
c): using a golok.
The draw cut or saber cut is achieved by pulling the knife at impact. Another way is to drag the blade slightly behind the hand with the arm in a rotational movement from the shoulder. This creates a strong shearing effect, as the edge push cuts and slices in the same time. It is in the example shown with various blade types. Some blade types make it instinctive, some more difficult.
It is a surprising thing, as one can cut 6" sapling for a day in 3 or 4 strokes and then suddenly master a draw cut that flies though it at first stroke, the blade not even feeling it or being stopped.
Inversed draw cut or wrist snap
Inversed draw cut
Here is shown using different blade geometries an inversed draw cut.
a): using a straight knife.
b): using a kukri.
c): using a golok.
The inversed draw cut consist of pushing the blade away instead of pulling it down. most people describe it as a wrist snap at the moment of impact or slightly before. Again, in this example it is shown using different geometries and some blade types like the kukri are better than others at that.
Like for the draw cut, the cutting power is much stronger, though it is difficult in the extreme to make it as powerful as an extreme draw cut, but the blade may not be stopped by what usually stops it.
The forced cut
Forced cut
Here is an example of a forced cut
a): using a backward curved blade.
b): using a forward curved blade.
The forced cut happens when the geometry’s natural tendency is used to force the edge in the material to cut, by pulling it in of pushing it in depending on the blade geometry. It could be thought that it is similar to a simple chopping movement using a flat bladed machete, hitting flat, but not exactly as the shoulder and arm and torso are really implied into pulling, or pushing away laterally, giving it even more power.
It is generally applied by people using great force, which makes it quiet dangerous in case of miss, glance, or deflection.
Combinations
Most of the time, an effective movement will be a combination of the previous basic moves.
Rotation points
Indeed nothing is simple, and any of these moments is subjected to anatomy, and while chopping or using a knife in general, a lot of joints are used to create either translations or rotations or complex rotations, in order to create the desired effects, and increase or lower power.
Points or rotation
Here simplified:
a) wrist
b) ankle
c) shoulder
d) spine
So, indeed efficiency while chopping, is a question of coordination, and using the right dose of power. Often gravity is quite enough to achieve the desired effect.
Safety
I insist that full full force blows are prone to lead to serious injuries. The correct manner is to speed the blade, and then let it impact. This will save the handles/blade junctions, is less tiring, and will produce less unsafe glances deflections and cut-through. Working with gravity is the right way. At least start the learning curve this way, after it is easy to add power properly.
The following information was pulled from Field and Stream Magazine.
Fell a tree
If you can double a sapling over using one hand (limber it up by bending it back and forth several times), you can slice the trunk in half using downward pressure with an angle cut. The sapling must be green and the pressure should be evenly maintained throughout the cut, although with larger trees it may be necessary to rock the blade. Support the sapling as the trunk weakens. It will be impossible to finish the cut if the wood splinters.To bring down softwood trees (poplar, birch, some evergreens) up to 6 inches in diameter, pound the knife tip into the tree at a right angle to the trunk, then jerk it sideways or pound the spine with a baton (a hard stick used as a club) to work the blade back and forth and widen the cut. Repeat the process around the trunk.
Split Wood
A knife runs a poor second to an axe as a chopping tool, but when pounded with a baton, a small blade is perfectly capable of making dry splits from wood blocks. Rapping the knife with a baton, split a thin shingle from the side of a dry wood block. Sharpen the edges of the shingle to make a wedge, insert the wedge into a crack in the wood (or make a crack in the wood with the blade), then pound the wedge with a baton to make wood splits for the fire. Using a series of wedges, you can split a log section lengthwise. You can also use a baton and blade to split the chest cavity of an elk or moose. Keep to one side of the sternum for an easier cut. Create cord
Cord is a primary survival tool, essential for fashioning bowstrings, lashing gear, and strengthening braces for shelter. The hide of almost any animal can be rendered into strips using a circular cutting technique. Drive the knifepoint into a flat wood surface, then pull the hide into the blade in a circular pattern to make a long strip. A guide peg driven into the wood maintains an even cut. Make a fire starter
If you can’t find dry kindling for building a fire, you can use your knife to make some in the form of a fuzz stick. Rest the end of a stout stick on the ground, then shave downward to lift curls of dry wood. At the end of each stroke, pry outward with the blade to spread the feathers. The end result will burn readily.
wannabemountainman- Admin
- Posts : 433
Join date : 2009-07-12
Age : 74
Location : M'boro UK -

ThreeperMan- Admin
- Posts : 537
Join date : 2009-07-12
Age : 74
Location : Galveston, TX
» Survival Skills - How to Build a Debris Hut
» Survival Skills - How to Build a Spear With the Hoffman Harpoon - Hedgehog Leatherworks
» Starting a Fire for Survival
» How to build your own underground home
» Build an Emergency Heating Stove
» Survival Skills - How to Build a Spear With the Hoffman Harpoon - Hedgehog Leatherworks
» Starting a Fire for Survival
» How to build your own underground home
» Build an Emergency Heating Stove
Page 1 of 1
Permissions in this forum:
You cannot reply to topics in this forum|
|
|
Prepper Broadcast Network
|
Online Education Radio at Blog Talk Radio with American Preppers Radio1 on BlogTalkRadio
Find Additional Education Podcasts with American Preppers Radio on BlogTalkRadio
|
Stop the NSA
[if !(lte IE 8)]>>
Flags